27 Feb 2017 by pepijn
Quickpost
Last week, a set of tweets from Tyler Loch shed some light and hope on the quest to get an APFS boot volume going prior to Apple officially making it an option in a future macOS 10.12 version. After the fourth 10.12.4 beta was released I decided to try my previously failed attempts again, following Tyler’s hints to help me along. I was finally successful, so to help others wishing to boot from an APFS-formatted volume here’s a quick post documenting the current process as of 10.12.4 beta 4 (16E175b). I believe that his is currently the quickest way to take an existing HFS boot volume, convert it to APFS and configure it for booting. Going forward you should be working with a non-production test system that you can afford to lose in any horrible APFS conversion accidents. I used a VMware Fusion VM without trouble, and as I will explain towards the end of this post, using a VM is preferred. Big thanks again to Tyler for his pointers! (BTW: Big fan of VisualHub from way back)
Read more...
10 Feb 2017 by pepijn
Mac AD UK 2017 slides are available
Another fantastic edition of the Mac Admins and Developers UK Conference (or MacADUK 2017 for short) has come to an end. With an improved venue and great speaker lineup I very much enjoyed meeting up with and speaking to fellow Mac admins to hear their stories and learn from them.
My talk this year focused on the changed landscape in security for Mac admins. No longer is it sufficient to just run a very tight ship on the admin’s end, but instead concepts like security hygiene and endpoint risk are playing a much bigger role in assuring your organization does not become another data breach statistic.
While we were all together in one place the hosts of the Macadmins.org Podcast also found some time to record a special live episode, courtesy of Charles Edge’s hotel room and with special guests Henry Stamerjohann and Éric Falconnier who represented Zentral and Richard Purves who spoke about all things SmartCard on macOS. Do yourself a favor and go listen to the episode first, then read through my slides.
A huge THANK YOU to the conference organizers and the entire team that made this year another success, I am honored to have been allowed to speak again.
You can grab the slides right here.
Read more...
26 Nov 2016 by pepijn
Introduction
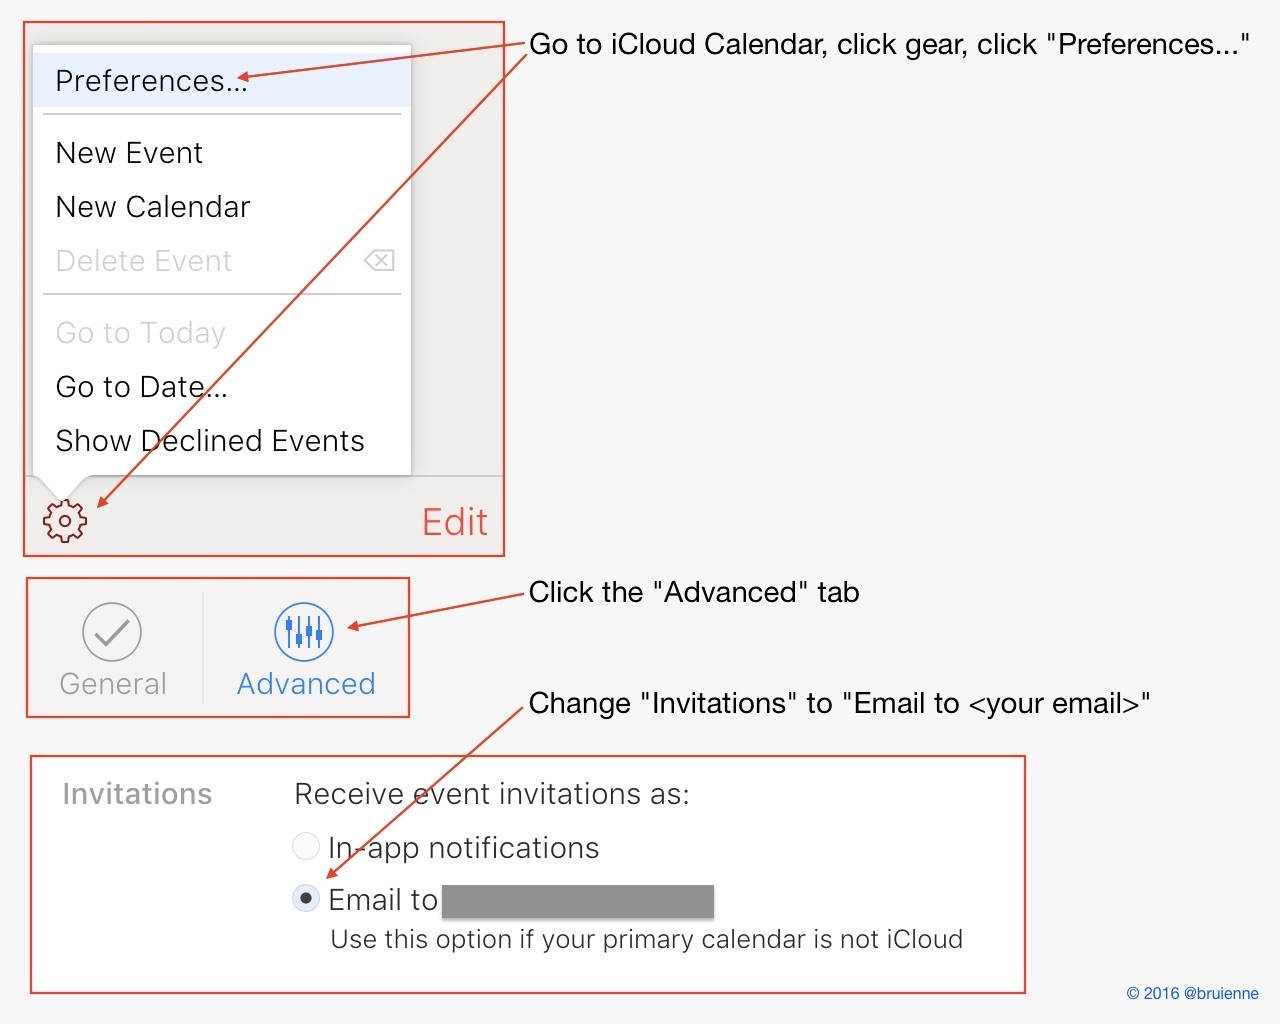
Since iCloud calendar spam suddenly appears to be a thing and a bunch of folks both asked me about it and offered possible solutions I whipped up a quick infographic on how to deal with it, or at least how to make it less annoying by being able to filter it.
What’s this anyway?
By default iCloud automatically adds calendar invites to a user’s pending events list, generally a good thing if someone wants to genuinely invite you to a meeting or some other event. As with anything else that involves computers, someone figured out that this would also make a fine way to advertise their knock-off watches, sunglasses and other merchandise by mass-sending calendar invites that include links of varying degrees of ill repute.
Just stop.
Agreed. So to wrap up other more long-winded explanations on how to do this I whipped out trusty Preview.app (in keeping with my stdlib or GTFO credo) and put together the following Twitter-friendly graphical how-to.
Read more...
04 Mar 2016 by pepijn
Introduction
After this past weekend’s kext-ageddon it once again became clear that Apple seems to have a problem with QA when it comes to OS X, as discussed on this week’s Accidental Tech Podcast episode. While there are many areas of OS X where poor QA will likely go unnoticed by users until a later update fixes whatever QA missed, Apple has been unfortunate as of late with the specific areas of its OS X that were hit by poor QA.
There were several App Store certificate expiration occurences that caught developers and users off-guard, the most recent one happening in mid-February as summarized here by Michael Tsai.
Read more...
28 Jan 2016 by pepijn
Introduction
A question came up in the Mac Admins Slack #general channel regarding skipping the Wifi setup pane in Setup Assistant. The user “tuxudo” wondered if any methods exist to skip the Wifi setup pane during a Setup Assistant run. The main use for suppressing the Wifi setup pane is to avoid confusion when deploying Macs that lack active wired networking and receive their Wifi configuration through a profile. Unfortunately the Wifi setup pane will still appear in this scenario as Setup Assistant has no knowledge of installed Wifi profiles. This can lead to support calls and changes being made that diverge from the desired Wifi configuration.
Read more...
12 Jan 2016 by pepijn
Introduction
Apple has been heavily promoting the use of its Device Enrollment Program (DEP henceforth) for almost two years now since its introduction in February 2014. The promise of the program is “zero-touch” deployment of iOS and OS X devices directly to the customer, bypassing the common pitstop with an IT department for the required initial setup and preparation of the device before passing it on to the user. Most major MDM players quickly integrated the DEP functionality into their products while generally maintaining the feature’s black box status.
Read more...
17 Nov 2015 by pepijn
Just the facts? Go here!
Introduction
With each annual iteration of OS X Apple improves the capabilities of its tightly integrated MDM, DEP and VPP trinity which has also made it increasingly compelling for Mac admins to take a look at what these management options could mean for them.
Read more...
15 Sep 2015 by pepijn
Introduction
Based on a user request a question came up today regarding disabling the automatic Spotlight indexing of network volumes. While users can manually add local and network volumes to the Spotlight Privacy exception list this is not a very obvious process and it requires a tech to walk them through the process, usually more than once. When left unconfigured, Spotlight and its mds family of tools will continuously index network volumes, putting extra strain on network infrastructure and further degrading the already less-than-stellar SMB performance in OS X.
Read more...